Assembly BLOG 2017
This is turning my shell back to a finished car, i.e. lights, bumpers, interior, brakes, fuel system, interior, etc. I often come up with unexpected problems, and have to find solutions in order to go forward! I don't always find time to work on this, hence the gaps between dates!! Also this is my experience, warts and all. Sometimes I've made mistakes and had to subsequently correct them. Hopefully this may help others from falling into the same pitfalls!
Friday February 17th 2017
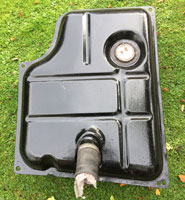
Removed petrol tank & cleaned it up. Cleaned windscreen, wrapped it in bubblewrap & put it on shelf in garage. Put in spare battery, tried to start but not enough. Put original battery on charge.
Saturday February 18th 2017
Cleaned floors of car. Started engine, ran for 10/15 mins. Sounds great! Tried fitting gas struts to bonnet!
Thursday March 16th 2017
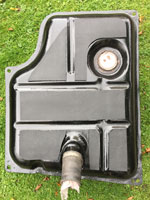
Fettle fuel tank to fit. Paint tank and diff & o/d covers in black.
Saturday March 25th 2017
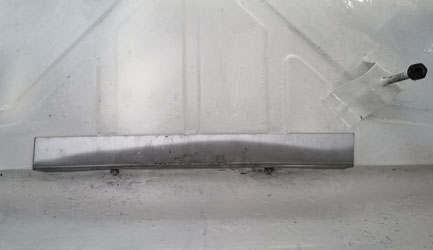
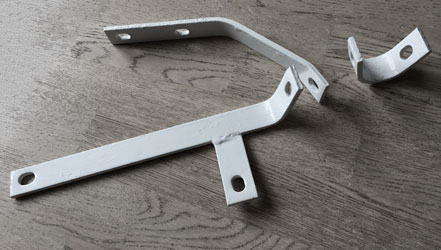
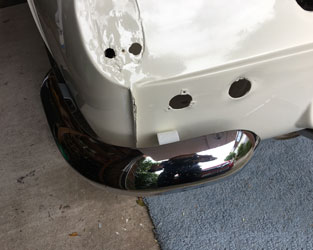
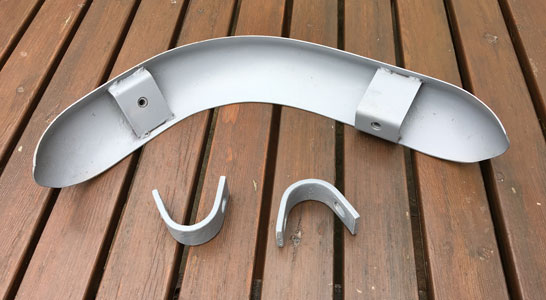
Cut & drill stainless steel angle, fit to rear of boot to strengthen rear exhaust mountings as below left (mounted to bodywork). Clean & paint rear bumper irons, one set below right.
Monday March 27th 2017
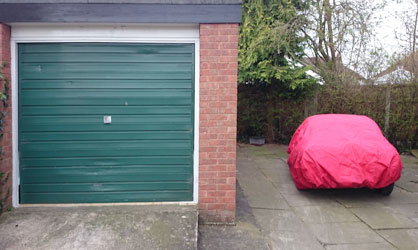
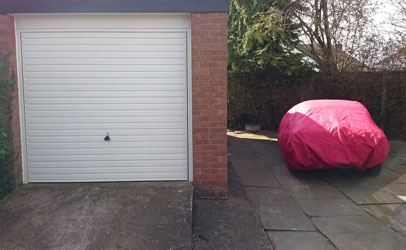
Drove car out of garage for new garage door to be fitted! The old and new doors can be seen below, with the GT6 safely in it's Hamilton cover while the new door was fitted.
Tuesday April 4th 2017
Fitted the TSSC Shop gas strut kit to bonnet. There is a story to this, as I spent a lot of time, and email correspondence with the TSSC trying to successfully fit it. The lower brackets didn't seem designed to fit the GT6 Mk2 at all, and the TSSC failed to send me a single picture of one fitted to a Mk2.
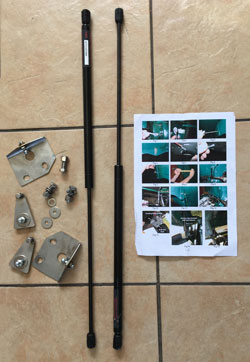
Sunday June 11th 2017
Removed gas struts completely (to send back for a full refund) as found that they were pulling the bonnet back towards the body tub! Ordered s/s conventional strut from Canleys. Started fitting rear bumper 'irons'.
Friday June 23rd 2017
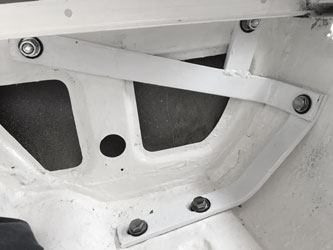
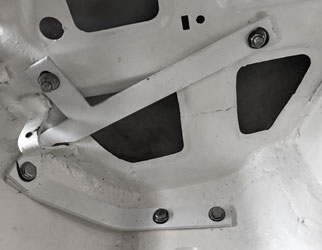
Fitted new stainless steel bonnet strut, see old and new below.

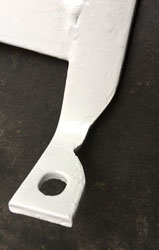
Also fitted LH & RH rear bumper irons with rubber washers and stainless steel fasteners. The LH (see 2nd and 3rd pictures further below) had the be ground away near the bottom to clear the fuel tank bracket, which must have been moved to a new position since the bodywork was done by Southside. The rear LH bumper was cleaned up, painted at the rear and fitted, also with stainless fasteners. The rear bumpers were purchased new in the 1980s, and are still in quite good condition.
Tuesday 4th July 2017
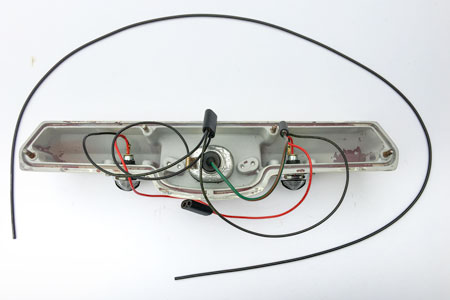
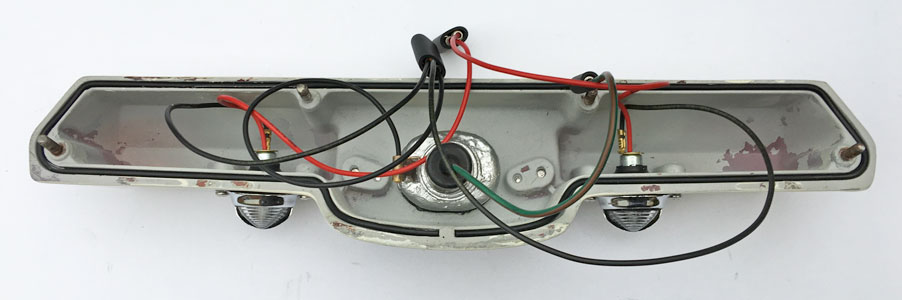
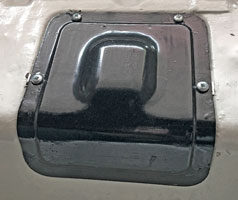
Re-assembled and rewired rear Reversing Light/Number Plate Housing.
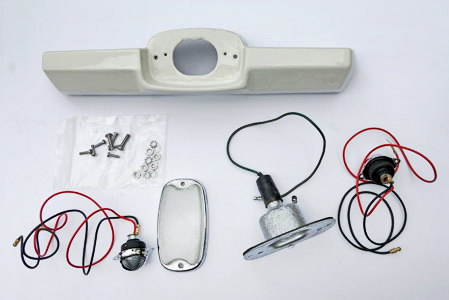
Original parts for these are unobtainable as only the later GT6 Mk2 and Spitfire Mk3 use these housings and Triumph parts suppliers don't list them. I therefore obtained parts as follows:
1. Number Plate Lights : As Triumph Stag Boot Lights...........
2. Reversing Light Lens : NOS Jaguar Series1 E-Type (ebay).
3. Gasket : Made from O Ring Cord Nitrile Rubber.................
4. Fasteners are new stainless steel........................................
5. Everything else was refurbished........................................
Tuesday 4th July 2017
Rear lights fitted. US style additional stop lights are fitted in the holes meant for early GT6 reversing lights (these had to b redrilled as they had been blanked off in the first restoration) as an added safety measure.

Wednesday 26th July 2017
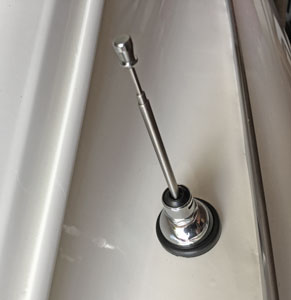
New aerial fitted.
Saturday 26th August 2017
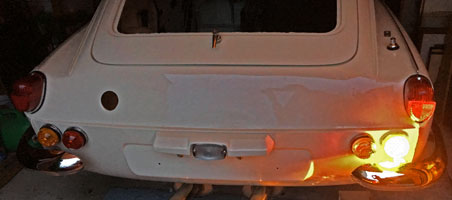
Rear wiring loom now all connected up - first test of rear lights...
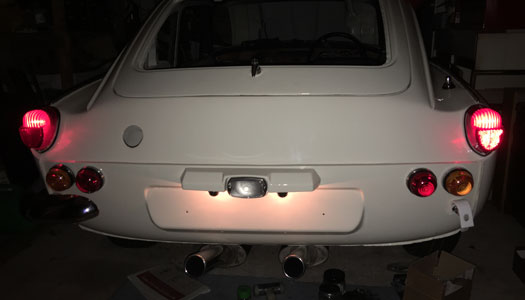
..and brake lights.
Monday 28th August 2017
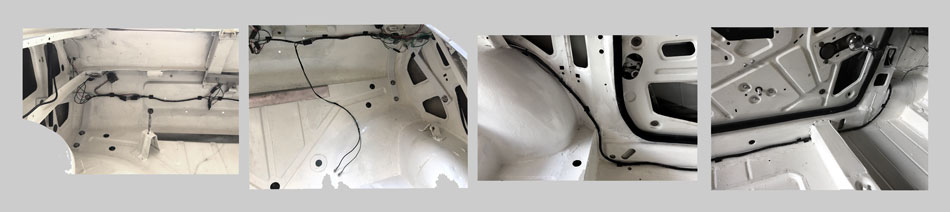
Rear wiring loom tidied up!
Tuesday 29th August 2017
Painted bumper irons and inside of rear bumper.
Sunday 3rd September 2017
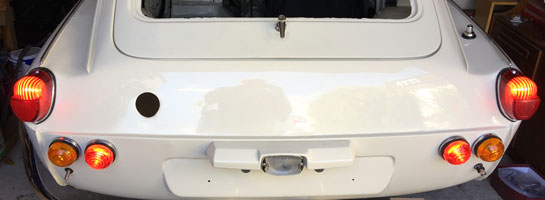
Rear RH bumper fitted.
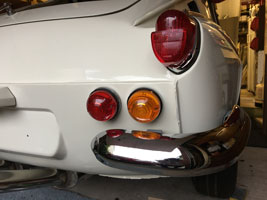
And rear indicators now working!
Monday 4th September 2017
Diff cover replaced with new fasteners
Wednesday 6th September 2017
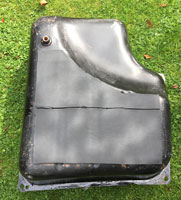
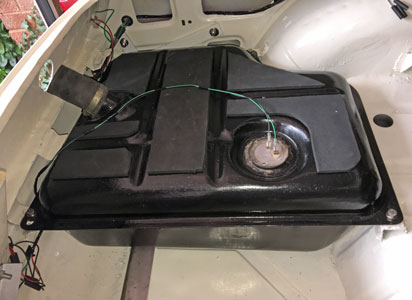
Fitted SilentCoat to fuel tank, then installed it into the car, after a quick rinse with petrol!
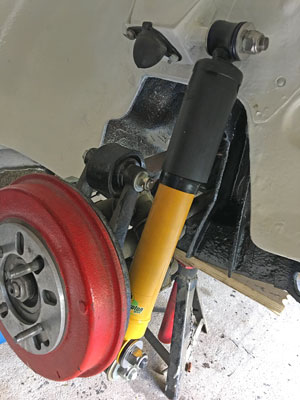
Saturday 9th September 2017
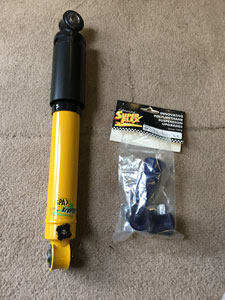
New SPAX shock absorbers arrived yesterday. Bought from JD Motorsport/eBay for a fraction of the price of other vendors, and they were sent directly from Spax Performance Ltd in Bicester so are the real deal!
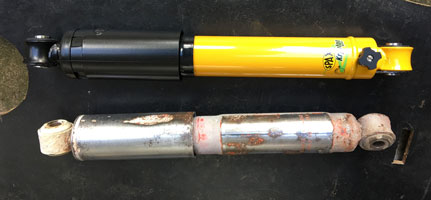
Above are the new Spax and old Armstrong shock absorbers (which I had originally intended to sand down and repaint).
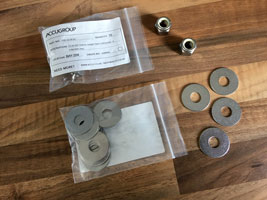
The thick washers which go on either side of the mountings are no longer available. These are 1/2 x 1.3/8" x 3mm (13mm x 35mm x 3mm). I bought some stainless metric ones (see below) which are 12.5mm x 35mm x 1.55mm). The washers are 1.5mm thick, so need to be doubled up to get the 3mm thickness of the original. The centres needed to be drilled out to 13mm to fit.
Sunday 10th September 2017
Now for the fuel line from the tank to the engine. The old line was ripped out, and I forgot to photograph it, so I'm not sure how to route the 5/16" copper replacement pipework around the rear transmission! A quick email to Andy Cooke, the TSSC GT6 Register, immediately elicited some images from his MkIII which proved useful. Thanks, Andy!
Monday 11th September 2017
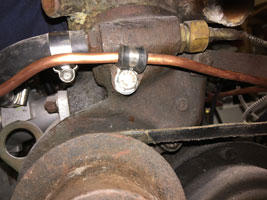
Progess on the fuel line. I was initially concerned with routing it near moving parts, i.e. the rear LH driveshaft. However it appears that this is unavoidable, so I routed it around the smallest part of the driveshaft and just under the transverse leaf spring, keeping it clear of any spring movement, and also away from the handbrake cable.
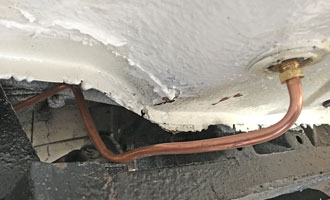

The last picture shows the end, to be joined to the front section by a PTFE stainless steel braided pipe (temporarily fixed by a cable tie). I will leave the fitment of brackets, as a brake line has to occupy the same part of the chassis (see bracket).
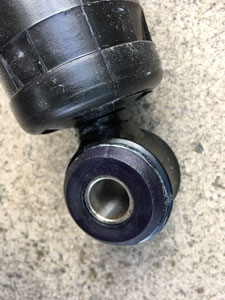
While awaiting the other parts I need, I fixed the poly bushes to the shock absorbers. Hint - don't try to fit the centre tubes first, fit the bushes (using a large metal vice as a press) then the tubes!
Wednesday 13th September 2017
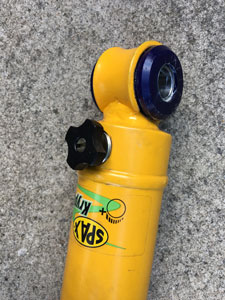
After drilling the washers (see Saturday 9th above) I fitted the LH shock absorber, torqueing the nyloc nuts to 55 lb-ft as per the workshop manual.
Friday 22nd September 2017
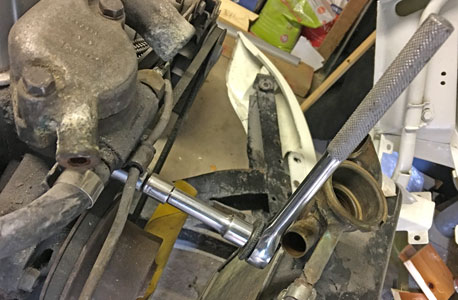
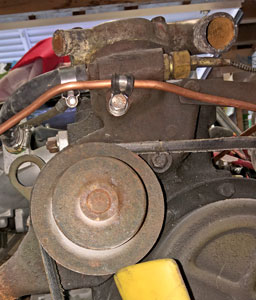
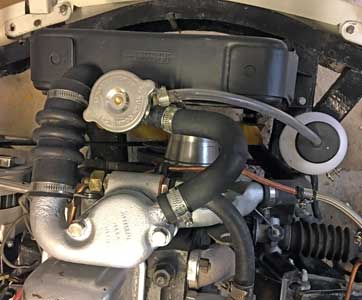
Removed the fuel line from the fuel pump to the carburettor. Hard to get at the nut holding the bracked at the front of the engine, so I had to disconnect the top hoses and move the radiator forward (see below):
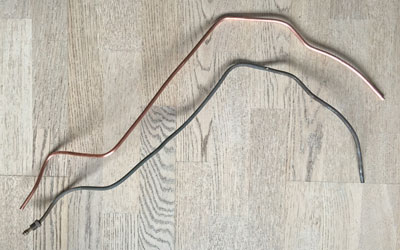
Below is the old fuel pipe with the new one, shaped to match!
And in position:
Saturday 23rd September 2017
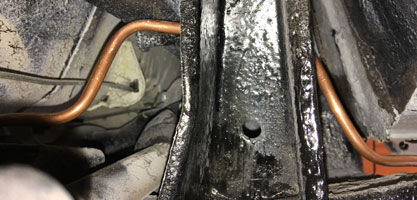
Started installing the brake pipes (while I await the stainless steel braided flexible lines for the fuel pipe), first the pipe on the LHS of the chassis from the engine compartment:

Monday 25th September 2017
With arrival of new stainless bolt and P clip from Grove, refitted 1/4" fuel pipe to front of the engine, and then put back radiator and hoses.
I'm not happy with the corrosion on the overflow pipe coming out of the radiator just under the cap:
It either needs replacing, or just cleaning up? I tried cleaning it up, and it broke off!
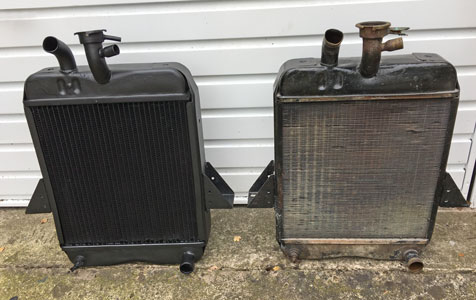
Tuesday 26th September 2017
Looking at the radiator again, I decided to invest in a new one. Which to go for, they range from around £200 to £250 from eBay or the usual Triumph suppliers for brass, and £188 to over £500 for aluminium. I couldn't justify aluminium, so in the end plumped for this one from Triumph-Recycler:
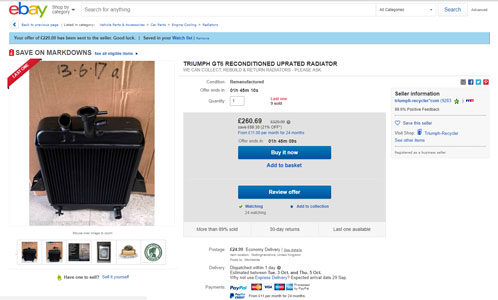
Why this one? Well it looked nice in the pictures. Seriously, the specification sounded good: "This is a genuine radiator professionally reconditioned with a new, modern, uprated 25-fins-per-inch core to give better cooling than standard or aftermarket radiators. Pressure-tested leak-free to 35psi & won't fall apart like those poor-quality Asian imports!". I did a deal with Simon Holland with my old radiator in part-exchange. He claims he is an enthusiast (having been a continuous Triumph owner/driver and member of the TSSC since 1988) AND trader who makes a very modest return for his investment in the marque, the vast majority of that coming from the sale of new parts, many of which he has manufactured locally with a significant personal investment for tooling and production. He is also a member of the National Association of Radiator Repairers and a Federation of British Historic Vehicle Clubs Trade Supporter. Images of the radiator appear below:
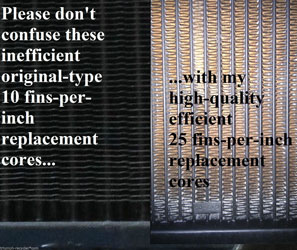
An efficient radiator should obviate the need for an aftermarket electric fan (although many are questioning the efficiency of these, often reverting to mechanical fans).
Thursday 28th September 2017
Fitted the badges to the rear.
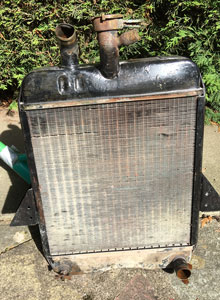
Removed the radiator. Lots of very brown water came out of the bottom (was clear at the top!)
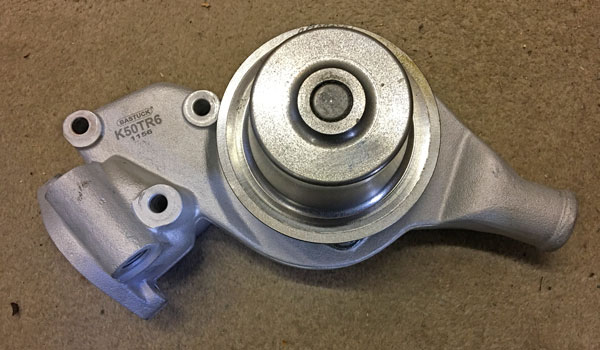
Ordered new water pump and Inpeller housing from Chris Witor.
Friday 29th September 2017
Removed the water pump housing.
Saturday 30th September 2017
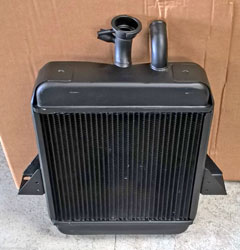
'New' radiator arrived from Triumph-Recycler:
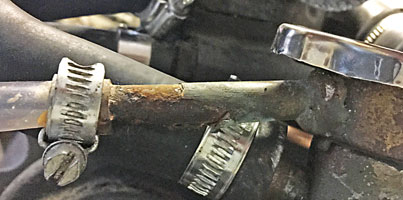
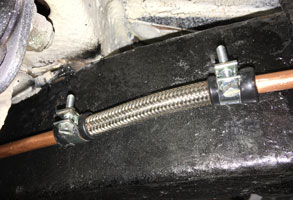
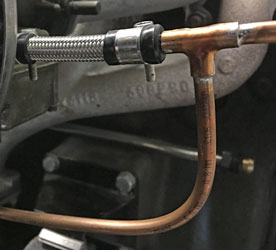
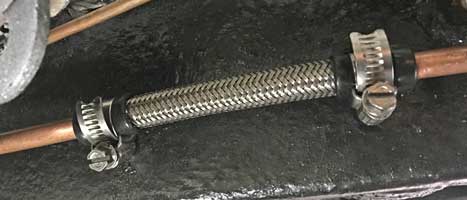
I fitted the flexible rear PTFE stainless steel braided fuel pipe joining the rear fuel pipe to the one running along the LHS chassis member to the engine. I had great difficulty cutting this tubing, trying an angle grinder and duct tape first but it still frayed the braiding too much to get the rubber end cap on. Eventually I used a combination of masking tape (it doesn't stretch as much as duct tape) and a junior hacksaw. I think the result looks quite neat:
Wednesday 3rd October 2017
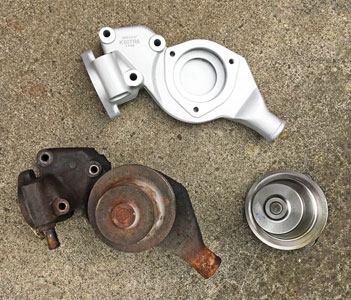
New light alloy impellor housing and water pump arrived from Chris Witor, with old below.
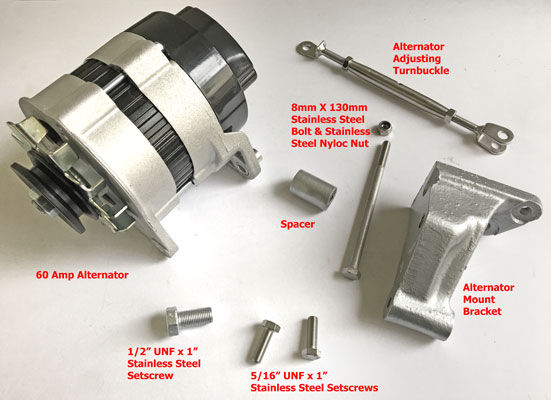
Monday 9rd October 2017
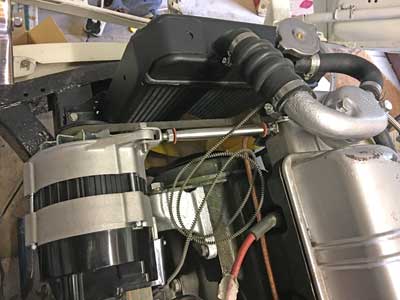
Alternator assembly ready for refurbishment.
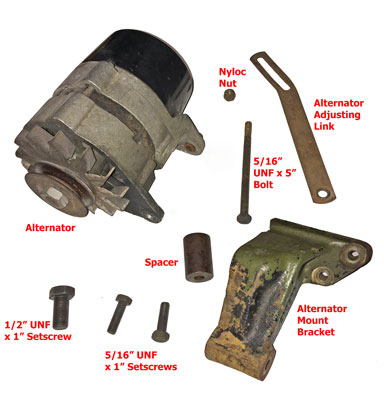
The alternator mounting bracket is very heavy and I was tempted by the alloy replacements available. However they look somewhat different (see below)
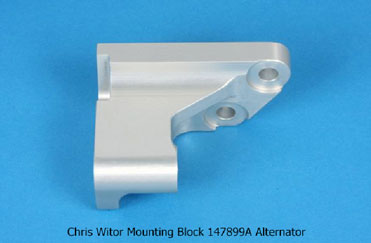
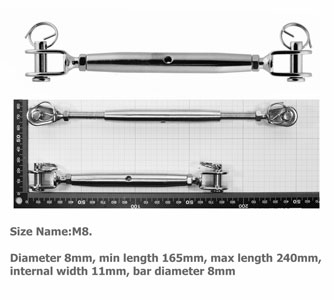
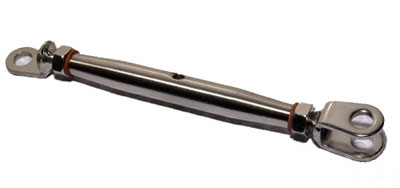
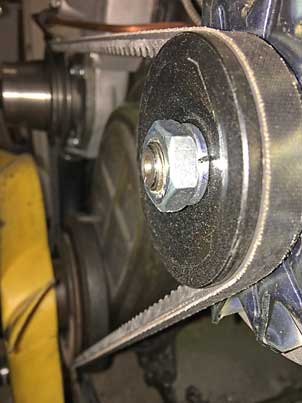
The reason, according to Chris Witor "The GT6 alternator was dropped to clear the bonnet", so fitting his bracket to permit the fitting of the 1088mm 2.5PI fan belt may well make the alternator foul the bonnet, a risk I was not prepared to take! The fan belt used in my car from the engine change in 1980 was a Chrysler 7100743 (Hillman Imp) and is 1175mm long x 9.5mm. The standard GT6 fan belt would not fit as the 2.5 engine has a larger crankshaft pulley. This fan belt was a tight fit, it would not come off without the aid of a long screwdriver to lever it off the pulleys with the existing GT6 adjusting link, so in a new setup a longer belt would be preferable! I am tempted by the use of a turnbuckle as proposed by 'Ben' in his GT6 / Spitfire DIY alternator bracket improvement (to visit the appropriate page on his his quick fix website click here). I have ordered one from Amazon, of all people, for only £5.05! This has a 'range' of 165mm to 240mm which compares to the 150mm to 205mm of the original. Hopefully I can try a 1200mm belt, but I'll wait until it's all reassembled and I'll measure it before ordering one.
I'll have to modify it, as per 'Ben' below
Thursday 12th October 2017
Water pump components ready to go back on the car, with stainless steel fasteners and other parts.

Friday 13th October 2017
New alternator assembly parts, ready to go back onto the car.
Wednesday 18th October 2017
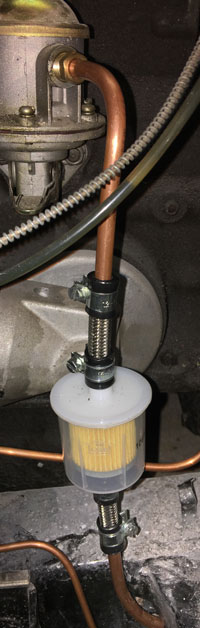
Completed renewing more fuel lines. This time the 5/16" id section from the entry of the long pipe from the tank as it exits the chassis at the front, to the fuel pump. Please note a fuel filter is now fitted, to stop any debris from the tank getting through!
Friday 20th October 2017
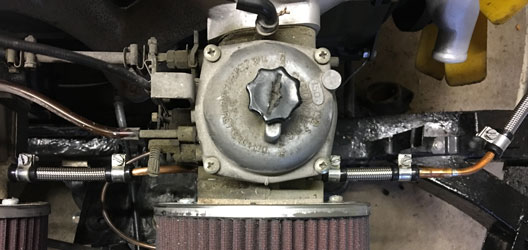
New 1/4" id fuel lines by the carburettors:
Sunday 22nd October 2017
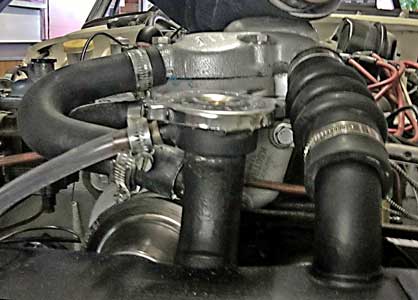
Fitted new water pump to water pump housing.
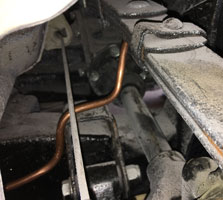
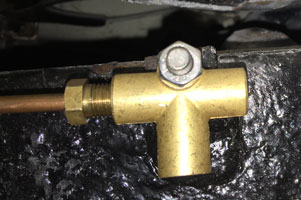
Also fitted 3-way brake union at the LH rear of the chassis, and connected the pipe from the front.
Tuesday 24th October 2017
Did quite a lot today, as the parts arrived from Chris Witor. I fitted the water pump housing and alternator, ordered a 1200mm fanbelt from Bearing King. As can be seen below, the old 1175mm fan belt won't quite go on! The capilliary sender for the water temperature gauge almost fouls the thermostat housing. I contacted Speedy Cables to see if they could convert my combined water temperature/oil pressure gauge to electric, but they declined.
Thursday 26th October 2017
Problems fitting the stainless steel pipe from the heater to the water pump. The original olive had split, so I bought a new olive and sleeve nut from Paddocks. When I came to fit them, the olive and nut wouldn't fit over the pipe (although that came from Paddocks a couple of years ago). A quick email to them elicited the response "You are more than welcome to bring them in I'm not sure there will be anything different but we can have a look" which didn't inspire confidence! However I went there and they said the pipe was faulty, would be sent back to their supplier, and replaced it with a new one FOC, what great service! It all fits perfectly now (see below).
Friday 27th October 2017
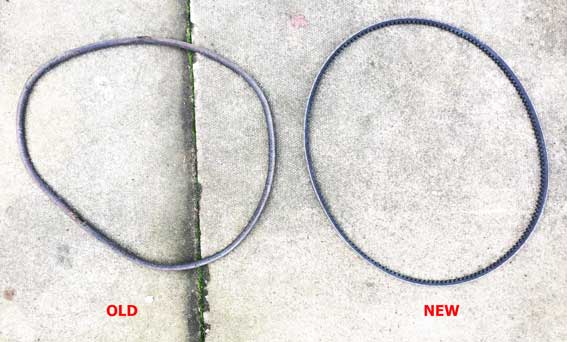
New fan belt arrived from Bearing King. Much too long, I shouldn't have assumed old one was 1175mm. On measuring it turned out to be 1130mm! I have now ordered another one 1150mm long. When I get the right one, I'll get a spare!

Above the old (1130mm) and 'new' (1200mm). I've managed to refit the originally fitted (Hillman Imp) fanbelt.
Saturday 28th October 2017
Fitted new stainless steel pipe from the heater to the water pump. Then fitted the 'new' radiator and associated hoses. Filled with the antifreeze solution previously drained, then put around half a gallon of fuel into the tank. Disaster, leaks everywhere! The clips aren't tight enough. Tried one of the small Hi-Grip hose clips I got from Grove Components to try, and this seemed to tighten much better, so ordered more, which will hopefully come on Tuesday or Wednesday. I also tried to start the engine, but didn't start although good oil pressure achieved. Then found the lead from the distributor was not connected to anything!
Monday 31st October 2017
New Hi-Grip clips arrived from Groves. Fitted them, put a little petrol into the fuel tank, tried to start. The solenoid clicked, but nothing else, so put the battery on charge again! I suspect the battery has had it, as it has spent long periods without being charged up.
Above, the rear join, on the LHS chassis. Below by the carburettors.

Thursday 2nd November 2017
New fan belt arrived. This time it's the right length!
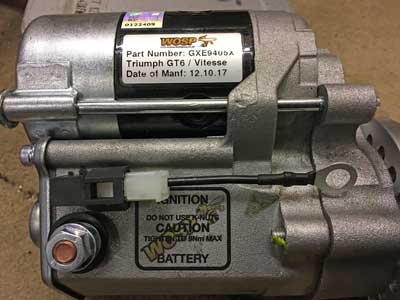
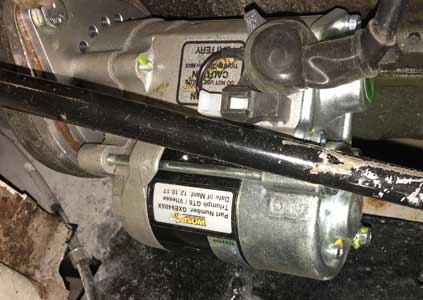
Also I bought a new High Torque Starter Motor from James Paddock. It is British made, by WOSP in Aylesbury. It wasn't on Paddock's website (they only listed one for the Herald) but when I called, they had a GT6 specific model in stock.
Friday 3rd November 2017
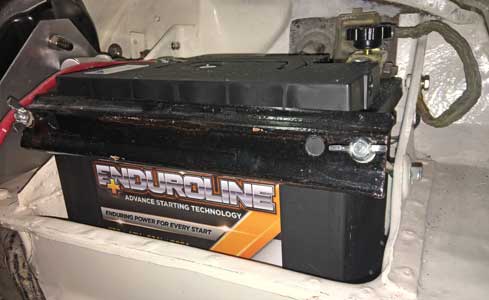
To get the car started I ordered a new battery, and also cleaned all the earth leads, as I believed that these would be the most likely culprits. I also decided to upgrade the starter to a High-Torque version. I got the battery from Tanya Ltd in Abergele. Ordered yesterday afternoon, delivered this morning! I also decided to stick with their Enduroline 075. I could have upgraded to a larger battery, I believe the 072 would have just fit, and the terminals would have been at the front. However with a more powerful alternator and more efficient starter I didn't think this was necessary. Also a bigger battery wouldn't have left room for the Dis-car-nect Immobiliser and Battery Cut-Off Switch, which I like, as it cuts off power to the car circuits when the car is unattended.

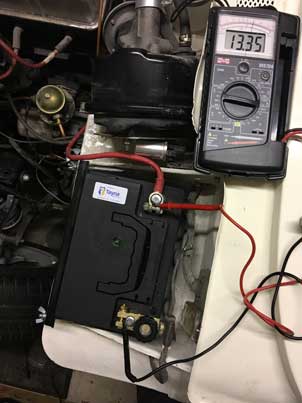
After all that it still clicks when I try to start the engine, but the new battery is not yet fully charged. Tomorrow, I'll try again. If it still doesn't start, I'll check the battery voltage (should be over 12.6 volts, apparently).
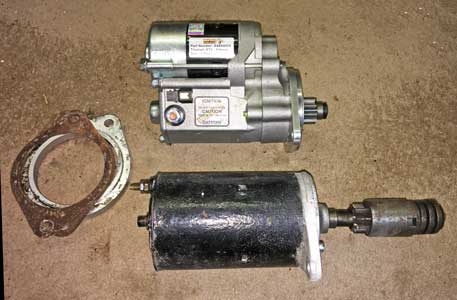
Above the old and new starter motors. Below the new starter motor up close, and in position. As it was an inertia starter being replaced, the black link wire is attached to the battery stud post (bottom left).
The battery is now fully charged, voltage now 13.35 volts (well above 12.6 as specified above). The car started almost first time, in spite of the fuel pump having to get petrol to the carbs (the high-torque starter being very effective). This is the first time the engine has run since 27th March. The fuel lines didn't leak either! Runs well with good oil pressure.
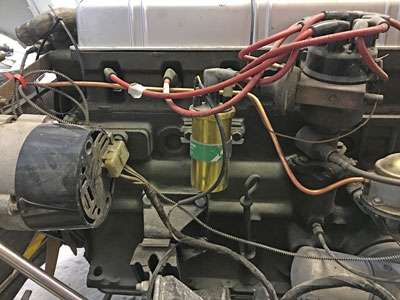
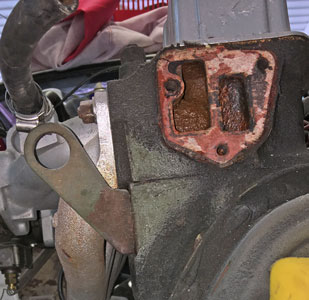
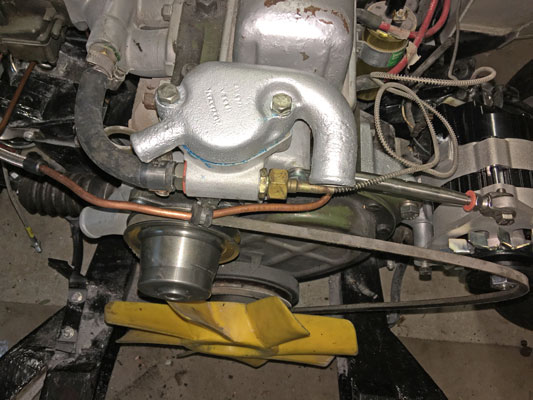
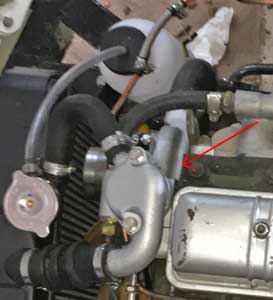
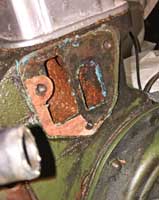
Dealt with a petrol leak from the left carburettor, caused by a sticking float. Tried to get the bottom off the carb, but it would't come off after removing the 5 screws. However, in the hope of the movement of this that the float would unstick, I reassembled and fortunately when I ran the engine again the leak had stopped. On running the engine up to temperature, a small leak from the top of the water pump housing manifested itself with a hiss of steam and bubbling. Tried tightening the top bolt, but this had no effect. It's difficult to get this really tight as the fuel pipe bracket is also attached by this bolt. I may have to remove the housing and re-attach it with a new, perhaps thicker gasket. Below a picture of my engine from above showing the location of the leak.
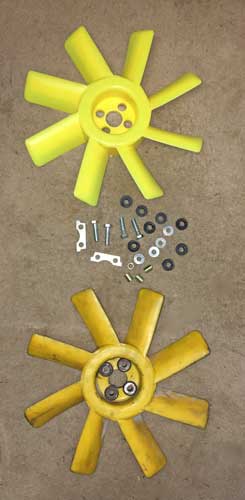
Thursday 9th November 2017
Various items arrived today:-
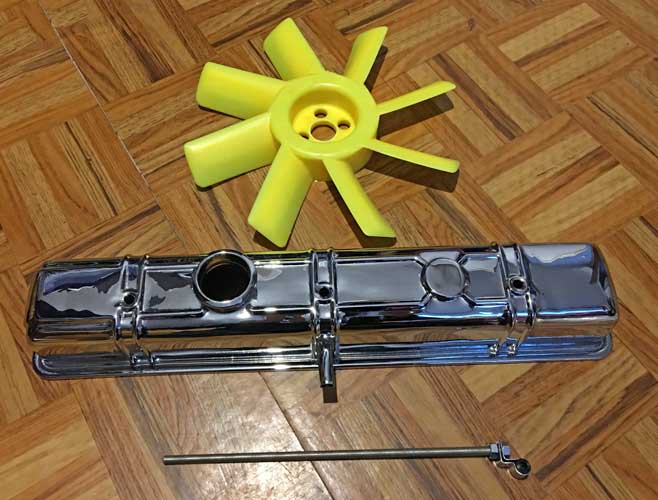
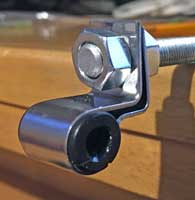
From top to bottom: New OE 8-bladed fan (the original has 'wobbled' after getting a wire caught around it a while ago); My spare 2.5PI rocker cover after re-chroming by S&T Electro-Plate in Bristol; A 5/16" UNF Threaded rod and a stainless steel fuel pipe bracket from Chris Witor with a polyurethane bush. Off to the NEC tomorrow!
Saturday 11th November 2017
About to work on the car when my dear wife Liz suffered a sudden and totally unexpected TIA (Transient Ischaemic Attack or mini-stroke).
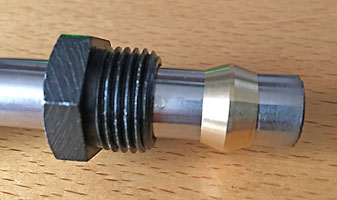
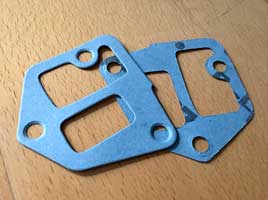
Liz much better, gone out with Becky - so while they were out I removed the radiator and the water pump housing and ordered a fan fitting kit from ANG Classic Car Parts. My plan is to replace the wp housing with a thicker, or multiple gaskets. I got a couple from James Paddocks and they seem much thicker than the one I got from Leacys which was paper thin (see remains below). Also I intend to replace the bolt which carries the fuel line bracket with a stud, as tightening this bolt sufficiently (20 lb. ft.) with the bracket in position was difficult. With a stud, it will be easier to tighten, as the fuel line bracket can be attached afterwards with an additional nut (also see below). Hopefully this will cure the leak!
There's a problem with the rear fuel pipe (LHS of rear chassis, below) - it keeps leaking. I've tightened it twice, blaming the cold weather. However I've decided it's no longer safe, so I have reluctantly ordered some 'Ethanol Proof Fuel Hoses by Gates' from Moss. It won't look as good, but should be leak free! To find out more about these hoses click here.
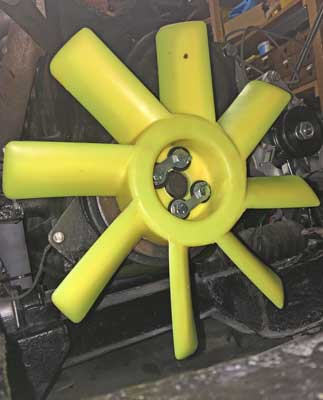
Tuesday 28th November 2017
Liz is getting much better, so spent an hour or two in the garage today. Fitted the new fan. The rubbers in the fitting kit I got from ANG did not fit easily, and had to be forced into position with a nut, bolt and washers.
I then ran a tap down the cylinder head holes for mounting the water pump housing and then cleaned the mating surfaces, before measuring the holes and the housing to see if the bolts I had used were not too long. Also I needed to calculate the length of the stud required for the mounting with the fuel line bracket. More about this next time...
Monday December 18th 2017
The results of my calculations for the fixings for the water pump housing appear below:
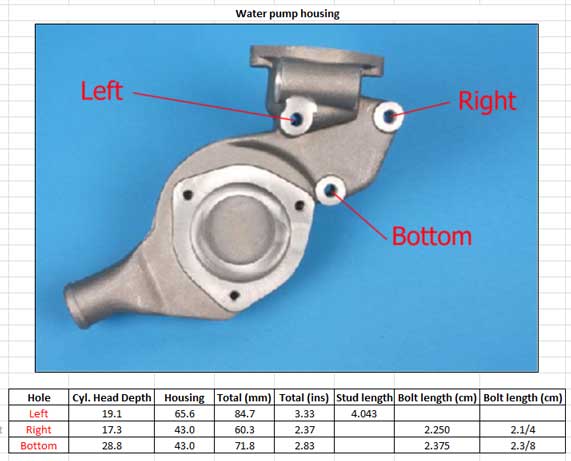
Finally got around to refitting the water pump housing, radiator, hoses, thermostat housing etc. I also finished the extension socket near the front n/s of the car so I can have the CTEK battery charger permanently connected without an extension cable.
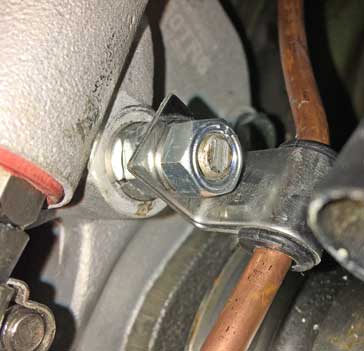
Above is the stut, substituted for the bolt, with the new stainless steel/polyurethane fuel pipe clip from Chris Witor fastenened with an additional nut. The reason for this arrangement is that I can torque up the nut holding the water pump housing to 20 ft lbs, without having to do the same to the fuel pipe clip, which then turns!
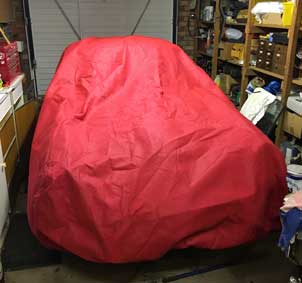
Finished by closing drain valve on radiator, checking all clamps are tight, and refilling with antifreeze. Now the car is all covered up in red for Christmas, and connected to the charger!
![]()